Monday, 30 August 2021

2 cards...one image part two

 Hi everyone

As I hinted yesterday, here is part two of my one image two cards, both very different in terms of feel, but the same cute image from All dressed up called Dog Walker.  Isn't she adorable?


This one is happy summer bold colours

Ingredients

  • Digi image - Dog Walker from All dressed up
  • Backing papers - first edition 6 x 6 pad called family ties
  • Coloured with Copics and Spectrum noir triblender brush pens 
  • Sentiment - Digi one from Lili of the Valley
  • Flowers - My Favorite things Stitched flowers dienamics
  • Glossy accents

I coloured her using my copics and cut her down on my paper trimmers, rounding the corners with a punch.  I added stitched detail with a fine liner in red, and then added black dots to make it look realistic.

I did the same to the printed sentiment.

Using three different papers from the pad I composed a background I liked, and cut out some flowers from the some red spotty paper I had in my off cuts folder.  layered it together, and then added glossy accents to her bag and boots for some added interest.

So... which one do you prefer, pastel or bold?  leave me a comment below and let me know, or hop on over to one of my social media pages (link on the main page) and let me know there.

I'd like to enter this into:

The Cutie pie challenge - Girls girls girls

Watercooler Wednesday - Feminine 

Creative moments - Anything goes

Through the purple haze - anything goes 

Cute card Thursday - Anyhting goes (Bright colours optional)

Thanks for stopping by

Crafty hugs

Rachael 


Sunday, 29 August 2021

2 cards... one image part one.

 Hello everyone


Happy bank holiday weekend for those in the UK - I hope you get some time off to spend with your families.

I am heading off this afternoon for a barbeque with my brother, his wife and their three children so may not be able to blog later today after a few glasses of wine!

So ahead of that I thought I'd share two very different cards, made with the same image, one today and the second tomorrow.

Anyone who used to follow my old blog www.allthingspurpleandsparkly.blogspot.co.uk will know I used to design for all dressed up.  I've been keeping an eye on the images as they are released and I couldn't resist this cute girl walking her dogs!  It was just tooo adorable to ignore!  

I coloured her twice, once in bright primary colours,  the second in muted lilac tones - I can't decide which one I like best - I'll let you decide!


Ingredients for lilac card

  • Digi image from Etsy - Dog walker 
  • coloured with Copics
  • dies 
    •   Scallop oval from Elizabeth craft designs
    •  Ivy from Joanna Sheen
  • flowers from my stash
  • backing papers - Dovecraft back to basics
  • sentiment - waltzing mouse stamp (although it must be 12 years old and I cant find the name of it) 
  • White border is a Martha Stewart punch 

I'll pop back tomorrow with the bold version... hope you like it!  If you do, please leave me a comment and hop over to my other social media channels (links on the main page of my blog) for more inspiration.

I'd like to enter this into

All dressed up - anything goes

A gem of a challenge #18 - Anything goes

Sweet Stamping - lots of layers

Colour crazy wk 34 - Anything goes

Cards for Galz - National dog day

Lemonshortbread #153 - Anyhting goes


See you tomorrow

Rachael


Monday, 23 August 2021

Birthday Witches

 Hello everyone - Happy Saturday!

For anyone living in the UK... what has happened to the August heat wave we were promised??  I'm currently sat looking out at the most dismal, grey, rainy day.  It looks more like October than August!

Speaking of October, I note that lots of the new releases are Halloween themed.  Now I don't really do Halloween as a rule but I did see this pretty image from Lili of the valley and just had to have her. 

I thought she would make a cute birthday card rather than Halloween so I coloured her up and made this little treasure.


Ingredients:
  • Stamps - Lili of the Valley Digi stamp (available from Etsy)
  • Sentiment - computer generated using a free font
  • Coloured with - Copics
  • papers - 
    • Digi papers again from Etsy (Called Blush and black but i cant remember the name of the shop, sorry) 
    • rose gold Mirri from Sizzix
  • embellished with black Nuvo drop.
  • Dies 
    • basic circle dies from Tattered lace 
    • Graceful Borders for Spellbinders
I resized the image using Craftartist and typed the sentiment I wanted to add, then printed this off. I couldn't resist the birthday pun - perfect for my friend who frequently calls me a witch (ha ha you know who you are!!)  I also printed the blush spot paper and the black and white geometric papers too.

I coloured her up using my copics in matching colours to the papers and cut her out using my scan and cut.

I then cut out some circles from black card stock and the spotted paper, matted and layered with the black and white paper before die cutting the scalloped border.
I noted something blingy was missing, so I added the rose gold Mirri card as a strip and around the sentiments to make it shine.

Once stuck together using glue and foam pads I added the black Nuvo drops to finish off the card.

I'd like to enter this into:


Thanks so much for dropping by and seeing my work.  It makes my day to see the lovely comments you leave.  If you want to see more, then I'm also on Facebook, Pinterest and Instagram Just click on the icon above, and follow me there too.

Thanks again, see you soon

Crafty Hugs
Rachael 


Saturday, 21 August 2021

Cute critter birthday

 Hello everyone

It's me again,  sharing more inspiration from "The Glittery pink craft room" (although I have had a good tidy and vacuumed so there is a little less glitter than usual!)

I wanted to make something super bright and cheerful today, something that will make whoever receives it smile!  Its being added to the back up stash of emergency cards as I need to continue to rebuild my stash after donating everything I had.

Back to MFT stamps today to make this eye catching card.


Ingredients 
  • MFT stamps - Birthday buds
  • Coloured with Copics and Spectrum Noir triblend brush markers
  • dies - Stamps by me frame dies
  • white gel pen and tonic shimmer pen for embellishment
  • ink - Lawn fawn alcohol friendly jet black ink 
I stamped the  images and coloured them using a variety of alcohol markers.  I then put them through my scan and cut with a 1mm border to cut them out.

I rummaged through my stash of pattered card and found this super bright pink spotty paper to match my colouring, but I couldn't find yellow or aqua paper that matched so when I cut out my frames I used white card and coloured it with my alcohol pens to match
I also added a white card mat layer with some black fine liner faux stitching.  

The sentiment is also in the stamp set, and I white heat embossed it onto black card.

I finally layered the whole thing together, sticking it with glue and foam tape, added shimmer and white gel pen for effect, making a super cute, fun birthday card.

I'd like to enter this into:

Thank you for stopping in - if you land here (either intentionally or by mistake) please leave me a comment and become a follower.  If blogging isn't your preferred social media platform, then on the right side of my home page is a link to all social media sites I have.  Why not join me there!

See you again very soon for more inspiration

Crafty hugs
Rachael 


Tuesday, 17 August 2021

Cool birthday

 Hello crafty friends

I'm back with some more card making inspiration - penguins having fun in the sun.... 

I wanted to make a more masculine card and thought this as a fun idea using these super cute penguins


Ingredients

  • Stamps
    • MFT - penguins in paradise
    • Anne-Marie - birthday stamp (background)
    • Lisa Horton - Everyday tickertape sentiments 
  • Coloured with Copics and Spectrum noir triblend brush marker
  • Inks
    • peacock feathers and squeezed lemonade distress inks 
    • Lawn fawn black alcohol friendly ink 
  • Die - tattered lace stitched basic circle
I started by stamping the penguins in the jet black ink and colouring them with my alcohol markers.  I then cut them out using my scan and cut.  I've had this stamp set for probably 3 or 4 years and I still love it! 

While that was cutting, I started on my background.  I used the happy birthday background stamp on my fingers, lightly inking and tapping down mainly across the middle section of the card, from top to bottom to add interest.
I then used my distress inks and blending brushes to create coloured patches in the background  and then added to the texture by smooshing the ink pads on my desk, adding water and lightly tapping my paintbrush across the panel.  I also did the same with a bit of lawn fawn sparkle liquid.

I dried this with my heat tool, and die cut a circle, layering everything together using glue and foam pads.  Matted onto a piece of black card stock, the finished card was a top fold 5x7.  Finishing touches with a white gel pen and three sentiments from the Lisa Horton set, and there we have a super male card. 

How I wish I was with those penguins!

I'd like to enter this into:

Crafty sentiment designs - Anything goes


Thanks so much for stopping by - please leave me a comment and sign up to my other social media by clicking on the icons on the right.  I'd love to see you there!!

Crafty hugs
Rachael


Saturday, 14 August 2021

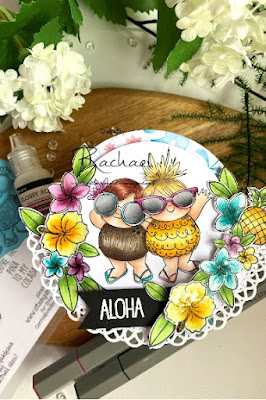
Aloha

 Hello friends


Today I wanted to make a different shaped card.  I have a note book where I list all ideas that I see from social media that I might want to try and if I'm feeling a bit uninspired I use this to spark some imagination.

This time I chose a cute (if not small) rocker card design, using a stamping Bella favourite of mine.  I just adore the squishies and when they come in tropical dress, its just too irresistible not to use.


Ingredient list

  • Stamps
    • Stamping Bella - tropical squidgies
    • MFT Polynesian paradise (for the pineapple, flowers and sentiment) 
  • Ink - Lawn fawn alcohol friendly ink
  • Coloured with - copics and Spectrum noir triblend brush markers
  • Dies
    • Tattered lace basic circle shape
    • Spellbinders large doily die
  • Finishing touches - Tonic shimmer pen and Ranger glossy accents

I stamped the image onto my card stock and coloured it in.  Instead of cutting around the image this time I used a basic circle die and mounted it on some patterned paper from my stash (is a scrap of Digi paper so not sure where its from sorry!).

I then die cut the large doily die and scored down the middle causing a fold to form the card base.  As I layered it together I realised it needed some framing, so I used another of my favourite tropical stamp sets and used it to make the floral wreath and pineapple.  I also thought the aloha sentiment was perfect from the MFT set too.  I stamped and embossed in white on a scrap of black and cut the flag shape for interest.

I hope this sunshine filled card makes you smile today!

Please check out my other social media, and if you stop here by chance, please leave me a comment below so I know you've dropped in - it makes my day every time I get feedback or new followers! 

I'd like to enter this into:

Alphabet challenge blog - J is for just one word

Colour crazy challenge - Anything goes

Aud sentiments - anything goes with a sentiment 

Cute card Thursday - anything goes 

Moving along with the times - summer fun 

Crafty creations - anything goes

Crafty gals corner - summer fun

Crafty hugs

Rachael 


Wednesday, 11 August 2021

From sweet to sour....

 Hello everyone in blogger land!

Hope everyone is feeling fine this August day (I'd like to say sunny August day but I live in England and therefore its raining... again!)

To cheer me up and to remind me of sunshine and the Mediterranean (I hopefully I can go soon and enjoy the real sunshine and sangria!), I've made a card today using a Pink Fresh studio stamp.


Ingredient list

  • Pink fresh studio - Lemons and Blueberry stamps
  • Nina smooth Kraft card
  • Prismacolour pencils
  • MFT  - little Hello dienamics 
  • Ink - lawn fawn jellyfish ink 
A simple CAS design today.  I stamped the image for a no line colouring look. I had to do some stamp surgery though as I haven't got the die and it comes as one big strip.  I wanted them all to be separate so I took my scissors and delicately chopped it up.

 I decided on a kraft background for a change, and dusted of my Prismacolour pencils too.  I needed some colouring therapy, so this image was perfect as it too me about an hour to colour it all in.

The sentiment I cut from a cream card stock four times and layered them together for some dimension on the card.

I'm so pleased with the way the colouring turned out I almost don't want to give this one away. I might have to add it to my shelf of other projects I made and couldn't bear to part with - do you do this too or is it just me?   

Thanks so much for taking the time to read through and look at my makes - leave me a comment, and if you are on Facebook, Instagram or Pinterest, my buttons are to the right so you can follow me there if its easier.

See you all very soon

Crafty hugs

Rachael 

Monday, 9 August 2021

So Sweet

 Hello crafting friends, welcome back to my blog.

Todays card is another 3d pop up style, made with my MFT outside the box die-namics and mama elephant stamp set.

I just think these critters are so sweet and added to the sugary goodness cake and milkshakes its just too stinkin' cute! !  I could just devour one of these milkshakes right now calories don't count on a Monday - do they? 


Ingredient list

  • Mama Elephant - Milkshake stamps
  • MFT - outside the box level up die-namics
  • Coloured with copics and Spectrum noir brush triblend markers
  • Lawn fawn gingham paper pad and alcohol friendly ink pads 
  • stickles and glossy accents to finish

I cut out the card using white card and then used the accompanying dies to cut out of a lawn fawn gingham paper pad.

I stamped the images  and coloured with my pens, before cutting them out on my scan and cut.

I then assembled the card, before adding sparkle and some glaze on the sweet treats to finish the look.

Hope you're enjoying the content so far.  If you want to check out my other social media sites look to the right and click to link them directly to my pages.  If you have made it here please leave me a comment and check out my other posts.  If you like what you see, please follow me (you can see I'm starting out and trying to build up so I'd really appreciate your support) 

See you all soon

Crafty Hugs

Rachael


Friday, 6 August 2021

Unicorns and Sparkle

 Hello everyone

It's me again, back with another post about making pretty things... Speaking of pretty there is nothing more girly than a card with rainbows, unicorns, dressed up cats and sparkle...

Here's my make for today showing all of the above in the cutest way possible.


Ingredient list

  • MFT stamps -  Unicorns and glitter
  • Coloured with Copics
  • Stamped with Lawn Fawn alcohol friendly ink
  • Ink bending - Kitsch flamingo distress oxide
  • heart stencil and stripy paper from my stash

I stamped and coloured the cute unicorn girl and her sweet cat, and fussy cut them out.  I cut close to the shape so edged around it with a black marker to tidy up the edges

I die cut a heart from some scrap paper to make a stencil, then laid the heart stencil over the top.  I blended through both masks, then removed the top stencil leaving the large heart shape and with a light hand used more ink around the edge.  I stamped the sentiment and placed the stamped images on foam pads for a bit of dimension.  It was missing something at the side, so I added a strip of scrap paper down the left.  I finished it by covering the images with tonic shimmer pen, then adding glossy accent glaze to the bow, hats, flowers, shoes and rainbow (although the shimmer and glossy accents are hard to see in the photo but they are so vibrant in real life!)

Thanks for stopping by today - leave me a comment, and like and share my social media posts - links up here on the right.

Crafty Hugs

Rachael 


Thursday, 5 August 2021

Hello Sunshine

 Hello everyone

I made a card today reminding me of beaches, and sunshine and holidays!  Here in the UK we had a couple of weeks of sunshine, but now it is rainy and miserable again so I made a sweet card to cheer me up!

I used a cute MFT stamp set that is probably one of my all time favourites.  Its an old one, but I think you can still buy it.  I've had it for ages in my stash but I adore those tropical critters!


Ingredients list
My Favorite things stamps - Polynesian Paradise
Scan and cut for the scalloped shaped behind
Paper pad and leaf dies are from 'the works'
Coloured with Zig clean colour markers on multimedia paper from Daler Rowney 

I stamped and coloured the images and cut them out on my scan and cut.  At the same time I cut a scalloped circle from the library of shapes for the scene to be attached to.
I went into my green scraps folder and pulled out a few different plain green colours and used these to die cut out the tropical leaves.  using the scallop I layered everything together using glue and foam pads for a dimensional display.  The card is a 6x6 square card, so I trimmed the patterned paper to fit leaving a white border.  For finishing touches I added a tonic shimmer pen but being extra careful not to reactivate the zig ink and smudge the colouring... (my parrot only has highlights bless him!), as well as stamping the sentiment and white heat embossing on scrap of black card. 

Id like to enter this into:
Creative moments - anything goes
Polkadoodles digichooseday - Anything goes 
Unicorn Challenge - anything goes
Crafting Happiness - anything goes - top pick! 
Incy wincy designs - Summer/Beach


I hope this brings you sunshine too!

Crafty hugs
Rachael

PS - please check out my social media pages on the links to the right, and like and follow...  Thank you
x


Sunday, 1 August 2021

How you bean??

 Hi everyone

Today I'm sharing a cute card using my favourite colour combination and stamp company (well one of them - there are sooooo many cute stamps out there I struggle to choose!)

Again  no particular reason for this card other than to bulk up my emergency stash for those times I have forgotten someone's birthday and need a card to grab! This one is a cute shaker card.

Please check out my Instagram and Facebook pages on the link here on the right, I'd love for you to follow me.


Ingredient list:

Lawn fawn - How you bean stamp set
Card and patterned paper form my stash
Coloured with Spectrum noir triblend brush markers
Glitter is also from my stash

Its so difficult to see in the photo but the glitter has both fine and chunky and is rainbow iridescent.  Its so pretty in the shaker! I also add, that it is all around my craft room so its certainly living up to its name! 

I stamped all of the images and cut them out using my scan and cut with a 1mm line around the edge.  The jar I cut the middle with my craft knife.  I know that there are dies to match, but I don't have them so I improvise!  I made the shaker by stamping the jar again onto the spotty paper and fussy cut it out, doing the same to the acetate.  Because the line was so thin, I couldn't cut my foam tape without it tearing, so instead I used some purple fun foam in thin strips and glued them together to form a strong bond to keep the glitter inside.

I coloured the images with my triblend markers and rummaged through my card stock to find some colours that would match.  

I'd like to enter this into
Stamping sensations - celebration (Birthday) 
A perfect time to craft - anything goes
Createful heart - anything goes

See you again soon for more cuteness

Crafty hugs

Rachael