Friday 26 November 2021

Exciting news - GDT at colour crazy

 Hello everyone

So.... I have some super exciting news.... I have been invited to take part in a three month Guest Designer Team spot with the colour crazy challenge.

These ladies have made me feel so welcome already and have some amazing sponsors lined up. The challenge is Anything goes, you just need to colour something!  so simple and easy!

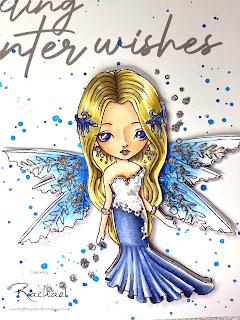
My first post is using this adorable image from Ching-Chou Kuik and it is called Snowflake Dollie 


Ingredients

  • Digi image Ching-Chou-Kuik 
  • Coloured with copics and Polychromos pencils
  • Digi printed sentiment 
  • Background splatters with a Sheena Douglas shimmer pen (summer sky)

This image was so detailed and intricate I didn’t want to distract from her with loads of embellishments and patterns, but I did know she needed to sparkle, and then sparkle some more!

I printed the background panel after designing it on Craft artist, and then printed two further images so I could colour and decoupage them for dimension.

Each was coloured firstly with copics then details added with my pencils to add depth, especially on her folds of her dress.

I then added splatters to the background panel and layered the princess together using foam pads.

The while thing was matted onto some silver glitter card, and extra sparkle added with simmer pens, and stickles in a variety of colours.  The photos don’t do the sparkle justice on this.  It shines!

I'd like to enter this into

If you want more information on the sponsors than please visit their Etsy page, otherwise, I'd love to see what you create and enter into our challenge.

Leave me some love, either here on on my other Social media pages, otherwise I'll see you back here for more makes from the desk of the glittery pink craft room!

Rachael 

Monday 22 November 2021

All dressed up latest release November 2021

 Hello crafting friends

I hope your Christmas card makes are coming along nicely, if you need some inspiration or even some new images, then Wendy has released some gorgeous ones this month.

Our fabulous DT launched them at the beginning of the month, and here is my inspiration for you using a super cute image called Fairy star


Ingredients

  • Digi image - Fairy start available from here on Etsy
  • Coloured with spectrum noir triblend brush markers and Polychromos pencils
  • The circles were cut on my scan and cut
  • Backing paper from simply creative paper pad called festive chic
  • Sentiment - Lili of the valley scripty Christmas sentiments 
  • Embellishments Creative expressions dies stitched collection - wreath

This card was supposed to be a shaker card.  I coloured her and cut out the circles, the frame and the acetate and filled it with sparkles, but then I realised you just couldn't see her in all her splendid glory, so I pulled the whole things apart and started again!

To cover up the glue mess around the edge I cut another frame on my scan and cut, and using the same purple card stock, matted and layered and added the detail across the middle. 

This super cute image is one of three, here are the others.


Aren't they just adorable.

You can enter our challenge here.  The only rules are it must follow the theme and use an all dressed up image.

Our blog challenge runs until the 15th and they have an anything goes challenge, so you can enter both to double your chances of winning some images. 

There is loads of inspiration on these channels but also on our Pinterest page. Please hop over and check out the DTs other fabulous creations. 

I'd like to enter this into.


Thanks so much for stopping by and reading my long post!  for shorter posts you might want to try Facebook, Instagram or Pinterest.  Links  are top right on my home page.  Otherwise, if you've made it this far you might as well leave me a comment, and follow me for more ramblings  until then....

Crafting hugs

Rachael


Sunday 21 November 2021

I wish you a merry Merry Christmoose

Hello Crafting friends


Welcome back for more inspiration.  This time its another Christmas card but made in muted greys and blues using a MFT stamp set. 


Ingredients

  • My favourite things Merry Christmoose
  • Coloured with spectrum noir tri blend brush markers
  • Scraps from my blue paper stash
  • Tattered lace basic stitched circle die
  • Clear embossing ink and white wow embossing powder

 I was lacking a bit of inspiration so did some searches on Pinterest for sketches.  I found this sketch originally for a square card, so I modified it and came up this idea.

I stamped the images, coloured with alcohol markers, and cut out with the matching dies.

I had some scraps of grey left from a previous project and wanted to team them with blue, so on digging through my scraps found some perfect paper to match.

I trimmed the banners by hand and cut them to size, and using a stitched die I cut out a circle, a scrap of grey to emboss my greeting on

I then layered everything together using foam pads, glue, and tape runner.

I love the CAS feel to this, it’s a great masculine Christmas card.

 I'd like to enter into the following challenges:

If you have found your way here, you might as well let me know and leave me a comment in the box below.  If you want more without all the blah, then maybe Instagram or Facebook is better.  All my links are on the page before.  I’d love to see you there!

 Thanks for stopping by! Pop back in a few days, there will be more from the desk of the glittery pink craft room!


Rachael

Friday 19 November 2021

Floral thanks

 Hi everyone

I recently went to the NEC craft show.  It felt so good to be back and be able to watch the demos and actually see the product.  I've ordered so much on line during the pandemic I'd forgotten the thrill (and how much it was going to cost me) seeing all the lovely show samples.


I brought a few new stamps (of course!!_) and some were the woodware ones.  I have had some in the past, and I had forgotten how good some of the designs are.  I decided for this card however to get some florals.  I have a few altenew florals but wanted something a bit different.

Ingredients

  • Stamps
    • Woodware Garden spray
    • Woodware texture
    • Waltzing mouse sentiment set (this is older than I can remember and I have no idea what is called the packaging is loooong gone!) 
  • Coloured with watercolour - Windsor and Newton set
  • Distress oxide inks for stamping texture
    • picked raspberry
    • black soot
  • stamped with black Versafine ink and heat embossed with clear wow embossing powder 
  • Sentiment stamped with Versamark ink and white wow embossing powder
I firstly stamped and coloured the image onto watercolour card stock.  I wanted a bold look for this one.  I did another card at the same time with a completely different soft feel that I'll show later but this I wanted to be bright and cheerful.

Once I'd stamped and embossed it, I added water to the petals and dropped in some watercolour paints onto the wet from the centre so the colour spread outwards.  I did the same for the leaves.  I then hit it with my heat tool to dry it and did the same again to add depth of colour.  To finish I used more intense colour and added the detail in.  

I then left this to dry while I worked on my background.

Using the same colour paint I'd used for the flowers, I watered it down and added blobs to my glass mat, and added some lawn fawn liquid sparkle to it for shimmer.  I then smooshed another piece of watercolour card into this, dried it and repeated for texture.  Once I was happy with this, I then used the texture stamps to add detail to the background around where I knew I wanted to place my stamp.

I fussy cut out the stamp, added the heat embossed sentiment and matted onto black card stock.  

I hope you like this -  change from the cutie stuff for sure, and a perfect stash filler in case I have to say thank you!

I'd like to enter this into:


I'll back back soon with more makes, to make sure you don't miss out please follow me here on on any of my other social media channels.  

See you very soon
Rachael


Sunday 14 November 2021

Love roo

Hello everyone

I made this card for my sons birthday last month, but just haven't got around to blogging it yet.

When my son was a toddler he couldn't say wallaby, so he called them "wobbalies" and the name has stuck ever since, so when I spotted this roo set from clearly besotted, it had to land in my basket!


Ingredients

  • Die -  
    • Mama elephant slim line scene builder
    • tattered lace basic circle
  • Stamps –
    • clearly besotted – Love roo
    • MFT lets stick together
  • Coloured with spectrum noir tri blend brush markers
  • Ink blending distress oxide inks
    • Chipped sapphire
    • Prize ribbon
    • Antique paper
    • Vintage photo

 I cut out of the panels for the shaped card and ink blended them all.  For texture I splatted each one with the same colours I had used to blend as well as black and white, with some shimmer pen in there too. For the circle back panel i used a large circle and chopped it in half in my trimmer to make a different backdrop.

I put these aside to dry while stamping and colouring all of my images, that I then put through my scan and cut and cut them all out.  I also cut out the word ‘Son’ in two sizes, one in black and the other in white

Now the background panels were dry, I glued them all together to form the card base, and placed my critters around the card to create a scene.  In the sky I adhered the ‘son’ word and stamped the happy birthday to room on the front panel.

He absolutely adored this – its still in his bedroom now.  His very own set of wobbalies! 

I'd like to enter this into

Thanks so much for stopping by - it does mean a lot when people leave comments, or follow my on FB, Pinterest or IG.  I really appreciate it!

See you again soon for more makes from the desk of the glittery pink craft rooms

Rachael 

Wednesday 10 November 2021

All my polkadoodles love

Hello everyone

I'm trying to use some of what I have in my craft room, rather than buying new and decided to do a search through my computer to see what I had on there. I've been crafting for so long that I have folders that I haven't even been into since 2010! 

While I was searching through my digi stash and found a whole kit I had totally forgotten about, and they're just super cute!

This is from a Winnie sugar sprinkles collection from Polkadoodles.  


 Ingredients

  • Stencil - the range
  • Ink - distress ink Kitsch Flamingo
  • Scalloped circle die - lawn lawn
  • Sentiment - Mama elephant big sending hugs stamp set 
  • Coloured with Spectrum noir triblend brush markers and
  • Polychromos pencils for detail

I printed her and coloured her, adding detail with my pencils to add depth after laying the alcohol pens down.  I then cut her out using my scan and cut (with a 1mm border)

I took a piece of plan card and using a stencil, added the tiny hearts to the background fading the colour out to the edges.  I die cut the circle from a grey card stock ad also stamped and heat embossed the sentiment onto the same card.  To make this pop, I also matted the main panel onto it too.

Everything was then layered with a combination of glue and foam pads for extra dimension.

I just love her - this is one of those cards you just don't want to give away!

I'd like to enter her into:

A bit more time to craft - Anything goes 

A perfect time to craft - anything goes 

The crafters cafe - anything goes

creations in pink - anything goes 

Digi chooseday - anything goes

Cutie pie challenge - anything cute

Thanks for stopping by - if you want to see more, there is other Social Media channels linked on my home page, or just follow my blog for regular inspiration all from the desk of The Glittery Pink Craft Room!

See you soon

Crafting Hugs

Rachael 


Saturday 6 November 2021

Walkies

 Hello crafting friends.  

Hope you're all keeping warn out them.  The clocks have gone back and November has certainly arrived with a blast of cold air!

Steering away from Christmas and winter, I thought I'd add some cheer to my timeline today with this cutie.

I have loads of Tiddlyinks digis from before they moved to Etsy, so this on is now retired, however I just wanted something happy to colour, and on scrolling through... Chose her.....


Ingredients

  • Tiddlyinks - Annabelle Puppy love (retired)
  • Pink petticoat - waterfall hearts in rose backing paper
  • MFT - stitched flowers
  • Coloured with Copics
  • Lili of the valley - everyday sentiments
  • Nuvo drops

After printing her out, I coloured her in pretty blues and pinks adding some white gel pen dots onto her dress.  I then cut her out using a stitched rectangle die and matted her onto black card.  I then printed out the pink hearts and found a scrap of light blue from my scraps folder and matted and layered these also onto black.  I realised it was missing something so I die cut the flowers out of white, and using pale tones of  the same colours in the image, I shaded them and added to the card with glue and foam pads. I printed the whole sheet of sentiments and fussy cut them out, sticking at a jaunty angle and the final touch was adding using glittery Nuvo drops. 

I hope she puts a smile on your face!

I'd like to enter her into:

Thank you so much for dropping by if you do, let me know you have by leaving me some love in the comment box below, and/or click on the other Social media links on my home page (there are top right)  

See you all again soon.
Crafting hugs
Rachael 

Monday 1 November 2021

All Dressed up - November challenge - Christmas and Sparkle

 Hi Everyone

We have another fantastic challenge over at All dressed up Facebook group, and one if you're making Christmas card will be easy to enter.  All you need is using an All dressed up image, share it with us and add some sparkle (well why wouldn't you on a Christmas card!)

You are in with a chance of winning three of Wendy's fabulous images

Don't have any? well you can browse the range here on Etsy. 

Once you are ready to post - add it to our Facebook group here.

I used one of my all time favourite images from All dressed up called little skater


Ingredients

  • Tag die (from my Moms stash so I don't have a brand)
  • Tattered lace snowflake dies
  • Hobbyarts sentiment stamp
  • Coloured with spectrum noir triblend brush markers 
  • Silver Mirri card 
  • Stickles Glitter glue and Nuvo drops for added sparkle.


I printed her out and coloured her in, before fussy cutting the image out and adding the stickles glitter for sparkle.

I took a white card base and die cut from another sheet of card, the tag and several snowflakes in different sizes.  I also cut the snowflakes from silver Mirri for extra shine.

I added the die cuts to the page, and added some white twine to the top of the tag.  I then layered my skater in foam pads and added her to the card.

Flor the sentiment I used a scrap of pink gingham from my scraps folder, and stamped the winter wishes from Christmas stamp set, cut a fishtail and the end and added this on.

A few more blobs of stickles and some silver Nuvo drops completes the over all look.

I hope you come along and join us - if you aren't making Christmas cards, you can always join our anything goes challenge on our blog  Or why not enter both and double your chances of winning!

I'd like to enter this into: 

Thanks so much for dropping by - leave me a comment if you do and if you would take the time to follow my page I would be very grateful.  If blogs are not your thing, i have other SM channels on the home age at the top right, so you can find me elsewhere on the internet!

Crafting hugs

Rachael