Showing posts with label ink splatter. Show all posts

Sunday, 19 January 2025

Sweet moments stamps and dies from Polkadoodles

 Hi everyone

Mrs Polkadoodles herself was on hobbymaker TV channel today with the latest stamp and die releases.

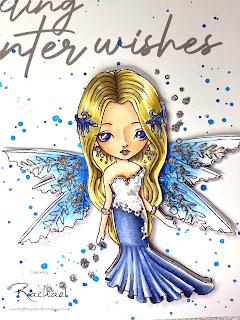
This is one of my most favourite sets - I had so much fun playing with these new goodies for the tv samples I made loads!

Here’s one of my favourite cards:


I used seedless preserves distress ink and a piece of acetate to make the inky background, finished with some splats 

The image was coloured with ohuhu markers and cut out using the matching dies.  I used a white gel pen to add details into the mug and bear’s hat.

The background I used black versafine ink and used smaller stamps from the set and randomly stamped them int eh background to add texture and interest.

The image was added using foam pads and I finished the card with a black fineliner to doodle the boarder around the edge of the card, with some bald Nuevo drops for shine.

I love how it turned out! Hope you do too!

See you soon
Rachael


Thursday, 16 January 2025

New release have a mice day

 Hi everyone

Quick post today showcasing one of the many cards I made with the new release from Lili of the valley.  

This sets called ‘have a mice day’ and can be brought from the Etsy shop online. There are four new sets all are soooo cute!


I stamped and coloured the image with ohuhu markers, before fussy cutting him out. The labels are a combination of stamps from a Woodward set and dies from a crafters companion set cut from white and teal card. The background is peacock feather distress ink splattered with some script washi tape and an off cut of black/white stripy paper

All layered with foam pads for dimension.

I think these mice are just so sweet. I made loads of cards with them

Thanks for dropping by!
Rachael


Saturday, 1 April 2023

mini moo challenge 2023

 Hi Crafting friends

I have something a bit different to share.  For the last month, I have been participating in the mini moo challenge over at Vera Lane Facebook group.  A mini moo is a little card measuring 2.75 by 1.25 inches so it's tiny.

You really have to think about positioning and how to create texture in the background on a very small scale.

Each day there was a different theme or prompt and the idea was to use Vera lane artwork and a few other craft supplies to make a set of cards to enter a challenge.

The prompts to match the photo below were:

Girly

Dog gone it

winter

crafter

birthday

garden

Holiday

Cats

Home

Black and white

flowers

transportation

Go fish

love

Oh boy

Spring

Face it

Yellow

Lets fly

Monochrome

Dee-licious

For the birds

Vacation

Halloween

Bright colours

Got the blues

sunshine

Fairy tale

trave

Song title

Good books


Each time I look at them I have a new favourite! Today it's the pink one with the flamingo for the beach!  

My plan is to now add them to a journal and keep them as artwork

Thank you to #veralanedesigns for a fantastic challenge!

Crafting hugs

Rachael

Saturday, 7 January 2023

Melon friends

 Hi everyone

Just dropping in today to share a cute card I made using a Gerda Steiner stamp called Melon friends


I stamped and coloured my image using copic markers and then fussy cut them all out.  

The background - I used a Mama elephant die set called mod heart which cuts out a stripy heart leaving a stitched heart aperture.  So... I got out my scissors again and fussy cut around the outline of the stitching to create a frame..

The card background was made using a woodware die, an aall and create die and some red festive berries distress oxide, splattered.

To finish the cute dino, I used glossy accents on his eyes to add shine and dimension.

I'd like to enter this into:

See you again soon.

Rachael 

Saturday, 27 August 2022

lets get spooky...

 Hi fellow crafters (and craft appreciators!)

I'm afraid Summer is drawing to a close, and looking at the prices of gas and electric in the UK, come the winter, we will be too cold to craft, so I'd better get ahead!

Our challenge is on again over at Polkadoodles week 35 - anything goes, along with a chance to win some of Nikky's amazing images - your biggest challenge will be choosing which ones!


This image is called Frankenstein monster boo and I have also used the Halloween paper bundle 2

I firstly used scattered straw distress oxide in the background, blending from the middle outwards like a glow, then added ink on the edges to frame him. I then used black gouache paint to splatter all over the background too.

I tore two strips of different papers to place across the bottom to ground my image.  He was printed out then coloured using copic markers then fussy cut and popped on some foam squares for dimension

I added the image and the sentiment, and decided it need more, so I went back to the paper pack and enlarged some of the skulls and fussy cut them out.

To finish the spooky feel, I doodled around the edge, and added some hand drawn cobwebs in the top corners

there are loads of great Autumn/Halloween images over in the shop - Please check them out.  Also see the other DTs amazing inspiration on the blog too!

I'd like to enter this into:

Daring card makers - in the long run (DL sideways)

My time to craft - fantasy whimsical

613 Avenue Create - anything goes


I'll see you all again very soon!

Rachael


Saturday, 13 August 2022

Little Monster

Hello crafting friends

I hope everyone is keeping safe and well out there, its certainly very hot in the UK at the moment again.  

Over at Polkadoodles we have a new challenge, as ever its anyhting goes, and we love to see what you create.  I've been looking at the last weeks entries and they are stunning..

You can win some of Nikky's amazing images and even the DT favourites get one each!  

Although its blazing hot it won't be long before the nights draw in and hot chocolates become a favourite, so this time my inspiration is an image that can be used for both Halloween and for kids birthdays in general.

He is called Fuzzypea from the little monsters collection.


As soon as I saw him I thought he needed to be green, but then I realised that's very predictable so I coloured him bright red instead! The background is a DL stencil from my stash and I placed it in the middle of the card like a panel, then used festive berries distress oxides to blend.  I wanted more contrast so I drew the squiggly lines down the side and then I splattered with black Gouache too.  So he pops off the page I die cut a piece of vellum and used foam pads to give him dimension.  the sentiment is from the Little Dudes dino - mite pack.  All finished with some black glossy Nuvo drops.

I'd like to enter this into:

Thanks so much for stopping by and reading my ramblings to this point.  For less rambling - check out Instagram, Pinterest of Facebook.  I still show the pictures, but there's much less waffle!

See you again soon.

Rachael

Saturday, 2 July 2022

Mermazing!

 Hi everyone

Its Saturday and therefore time for the latest Polkadoodles blog challenge. Its a chance to be in with winning three images of your choice from the Polkadoodles shop, or if you're chosen by the DT as top three, you get one image.

You can enter with anything goes, but the DT theme was ocean - a perfect opportunity to pay with the super cute mermaids.  There are loads of different ones on the website, but I chose this beauty! 

For this weeks challenge I used this cutie called is from the Winnie Mermazing collection called Octopus kisses.


I also used the matching digi papers for the torn strip in the background, a stencil called Land and sea  and finally the sentiment is from Winnie celebration sentiments

The image was coloured using copics and finished with white gel pen, sparkle pens and a drop of glossy accents to those sweet octopuses

I just love how this one turned out.  

I'd like to enter this into:

Simon says stamp - anything goes

Paper shelter - under the sea

Double D beach time

Through the purple haze - anything but square

Krafty chicks - anything goes

Craft rocket challenge - girls

As you like it - favourite - girls (I love pink and purple too much!)

Your next stamp - anything goes

Thanks so much from dropping by - please do check out our blog!  and if you want to see more inspiration from me, I have other social media links at the top right of the page.  Leave me some love - it always makes me smile.  See you soon

Rachael 

Wednesday, 1 June 2022

Birthday beach fun!

 Hello friends

Welcome back to my blog and more ramblings from the glittery pink craft room.

Today I'm sharing this super cutie made to inspire you to enter our all dressed up challenge on Facebook.

Every month on the 1st, we try and inspire you to use an all dressed up image and enter this challenge to win three of Wendy's amazing images - including new releases!

Our theme for June is pick a colour... an guess my colours!  Yes raspberry and black.  I just love these colours!!!


I printed her out and coloured her with a combo of copics and Polychromos pencils.

The back ground is a stamp from stampendous called Pop dots available from @Oakwooddirect.  The sentiment is from Claire manning designs

I did an inky background using picked raspberry distress oxide and speckled some on the page along with some black gouache.

A bit of sticky foam and I finished my card!

Please do stop by the Facebook page and check out the other DT inspiration, and then enter our lovely challenge!

I'd like to enter this into:

Through the craft room door - anything goes

Crafty calendar - anything goes

Crafty Catz - anything goes - twist all about the girls

Daring card makers - flair not square

See you all soon

Rachael

Monday, 6 December 2021

Alice in Crafting land

Hi everyone

Yesterday I was browsing Etsy for digi stamps. I wanted to find some new cute designs and as my craft room is rapidly filling up - I can always justify buying new digi's as they take up no room! 

I found this super cute set and brought it along with several others from a company called Caperuza sketch. they were really reasonably priced, and I adore the sketchy design.

Alice in Wonderland is one of my all-time favourite stories, and I knew they would have to be bright and bold and rainbow coloured.  I did colour them as close to the Disney film adaptation as possible.


ingredients

  • Coloured with copics markers
  • Digi stamps by Caperuza sketch on etsy here
  • Die - Lawn fawn scalloped slimline die with hears
  • Glittered with tonic shimmer pen and stickles Christmas berry red glitter
  • Ink blending with distress oxide inks
    • worn lipstick, 
    • scattered straw, 
    • broken china, 
    • villainous potion
I printed all of my images first, coloured them and cut them out using my scan and cut.
I then cut out the die shape with some smooth white card stock, and blended distress inks to create a rainbow.

I blended the colours to create the secondary tones of orange and green and at the end added come more worn lipstick so it looks like it going back to red again.

This was then splattered with black water colour paint and lawn fawn liquid stardust.

I printed the quote and cut it up, then laid it along with my images onto the panel using glue and foam pads.  I used a slightly bigger card blank to put it on to finish the card.

I just love how colourful this is and how cute those characters are.  I can guarantee I'll be back for more images from here, There were so many to choose from!

I'd like to enter this into:


Thanks for dropping in - if you could leave me a message I'd really appreciate it, or better still like and follow me on any of my social media channels.  The links are on the front blog page.

Crafting hugs
Rachael 


Friday, 26 November 2021

Exciting news - GDT at colour crazy

 Hello everyone

So.... I have some super exciting news.... I have been invited to take part in a three month Guest Designer Team spot with the colour crazy challenge.

These ladies have made me feel so welcome already and have some amazing sponsors lined up. The challenge is Anything goes, you just need to colour something!  so simple and easy!

My first post is using this adorable image from Ching-Chou Kuik and it is called Snowflake Dollie 


Ingredients

  • Digi image Ching-Chou-Kuik 
  • Coloured with copics and Polychromos pencils
  • Digi printed sentiment 
  • Background splatters with a Sheena Douglas shimmer pen (summer sky)

This image was so detailed and intricate I didn’t want to distract from her with loads of embellishments and patterns, but I did know she needed to sparkle, and then sparkle some more!

I printed the background panel after designing it on Craft artist, and then printed two further images so I could colour and decoupage them for dimension.

Each was coloured firstly with copics then details added with my pencils to add depth, especially on her folds of her dress.

I then added splatters to the background panel and layered the princess together using foam pads.

The while thing was matted onto some silver glitter card, and extra sparkle added with simmer pens, and stickles in a variety of colours.  The photos don’t do the sparkle justice on this.  It shines!

I'd like to enter this into

If you want more information on the sponsors than please visit their Etsy page, otherwise, I'd love to see what you create and enter into our challenge.

Leave me some love, either here on on my other Social media pages, otherwise I'll see you back here for more makes from the desk of the glittery pink craft room!

Rachael 

Sunday, 14 November 2021

Love roo

Hello everyone

I made this card for my sons birthday last month, but just haven't got around to blogging it yet.

When my son was a toddler he couldn't say wallaby, so he called them "wobbalies" and the name has stuck ever since, so when I spotted this roo set from clearly besotted, it had to land in my basket!


Ingredients

  • Die -  
    • Mama elephant slim line scene builder
    • tattered lace basic circle
  • Stamps –
    • clearly besotted – Love roo
    • MFT lets stick together
  • Coloured with spectrum noir tri blend brush markers
  • Ink blending distress oxide inks
    • Chipped sapphire
    • Prize ribbon
    • Antique paper
    • Vintage photo

 I cut out of the panels for the shaped card and ink blended them all.  For texture I splatted each one with the same colours I had used to blend as well as black and white, with some shimmer pen in there too. For the circle back panel i used a large circle and chopped it in half in my trimmer to make a different backdrop.

I put these aside to dry while stamping and colouring all of my images, that I then put through my scan and cut and cut them all out.  I also cut out the word ‘Son’ in two sizes, one in black and the other in white

Now the background panels were dry, I glued them all together to form the card base, and placed my critters around the card to create a scene.  In the sky I adhered the ‘son’ word and stamped the happy birthday to room on the front panel.

He absolutely adored this – its still in his bedroom now.  His very own set of wobbalies! 

I'd like to enter this into

Thanks so much for stopping by - it does mean a lot when people leave comments, or follow my on FB, Pinterest or IG.  I really appreciate it!

See you again soon for more makes from the desk of the glittery pink craft rooms

Rachael 

Tuesday, 12 October 2021

You Rock!

Hello Everyone

Hope you're all doing well.  I'm just recovering from a really nasty cold/flu.  It started last week and today is the first day I've even been able to craft... that's how poorly I was with it!

 I'm stopping by with another cute dino card - I made loads of these and kept them in the bank for when I wouldn't be able to make something (or for those occasions when our mojo just ups and leaves!).

This one is using one of my favourite Mama elephant sets called me and my dinosaur.


Ingredients

  • Stamps
    • Mama elephant Me and my dinosaur
    • Little Dino agenda
    • Paper smooches Sentiment sampler
  • coloured with Spectrum noir tri-blend brush markers
  • Ink
    • Memento Tuxedo black ink
    • Prized Ribbon distress oxide
    • Chipped Sapphire distress oxide
    • Salvaged patina distress oxide
  • Dark Navy card
  • wow embossing powder 
I stamped a selection of images from the stamp sets and coloured them in.  I knew I wanted a splatter background but not across the whole card, so I cut a circle using a die and used this as a stencil so my splatter is only in one place.  I finished this CAS card with a heat embossed sentiment.  

Hope you like it!

I'd like to enter this into:

Lil patch of crafty friends  -anything goes
A bit more time to craft - anything goes
Your next stamp Friday fun - setting the scene 
Creative moments - Anything goes

Please leave me a comment if you land here - i love to read them.  And if you love other social media channels, I'm on them too - link on my home page.  Please click, like, share, follow etc.... I'd be so happy to see you there!

Back soon with more crafty goodness
Crafty hugs
Rachael 

Sunday, 10 October 2021

Frightfully sweet

 Hello friends

A few posts back I said I do not do Halloween as a rule, I do not celebrate it and my son doesn’t go trick or treating.  Not due to religious reasons just because it doesn’t sit comfortably with me.  Having said that, I have had several posts recently about Halloween because the images are just tooooo cute! I saw this MFT one and had to have it.  There is something super sweet about animals dressed up to make a cute scene!


Ingredients

  • Stamps
    • MFT - frightfully sweet
    • Clearly besotted  - Alien attack
  • Inks
    • Distress oxides
      • Mustard seed
      • Chipped sapphire
      • Wilted violet
      • Twisted citron
      • Black soot
    • Versa mark
    • Memento tuxedo black
    • Hero arts unicorn pigment ink
  • Scan and cut
  • Gold metallic paint
  • White and black acrylic paint
  • Shimmer pen
  • Glossy accents

 I made this card into a z fold, but with a bottom bar to add the critters too.

I did this by taking a 6x6 card blank.  I folded the front page back on itself (so its like a z shape) and then opened it flat again. I then trimmed 1.5 inches off the bottom to make the bar.

 Before layering I inked the background. I knew I wanted a spooky house in the background so started with mustard seed in this location and added twisted citron across the bottom to add a spooky glow. I then continued blending using wilted violet, chipped sapphire and a bit of black soot along the top. Once I was happy with the blending, I added gold metallic, white, and black paints to splatter across the night sky

For the ground, my critters stand on, this was black card stock I cut into wavy lines added white pigment ink to the top and then layered them together. I used a white gel pen to add dots (I forgot t platter before I had assembled so had to improvise!)

I then stamped and coloured the cute critters from the MFT stamps set and the spooky castle/house from clearly besotted. And cut them all out using my scan and cut.

The bottom bar was added the opposite way around to the main card folds, and everything was then placed and either glues or foam pads used to adhere it together. The sentiment was from the MFT set and was embossed using white powder and a Versamark in pad. Finishing touches were a bit of glitter and some glossy accents.

Phew that was a lot of explaining!

 I'd like to enter this into:

Colour crazy challenge - Anything goes
Love to craft challenge  - Anything goes
Crafters Cafe - Anything goes 
Critter Crazy - Anything goes with a critter
Send a smile 4 kids - Holiday/Celebration
Crafty Calendar - Halloween
A gem of a challenge - Anything goes 


I hope you like this – please leave me a message if you land here, or if this isn’t your preferred social media – check out my other links on the home page.

See you soon

Rachael 


Friday, 1 October 2021

All dressed up - Facebook challenge, Autumn or Halloween

 Hi crafty friends


It is again time for the next challenge from All dressed up on the Facebook group.  If you want to enter all we ask is you use an all dressed up image, and make it to the theme of Autumn or Halloween.  There are loads of images you can use  on the Etsy page.

I used the image called Magical day  to make this:


I wanted to make her more generic than just a Halloween card, so I used Craft artist to make a digital sentiment that says "Hey Pumpkin" so I could use it anytime just to say hi. 

Ingredients

  • Digi image from All dressed up called magical day
  • Copic markers
  • Celery and grape jelly lawn fawn inks
  • Black soot distress ink
  • Lawn fawn shimmer drops
  • Glossy accents
  • Hunkydory Star stencil

I printed her out on alcohol friendly card and coloured her using copic markers.  I cut her out using my scan and cut.  While the machine was working away I used a starry background and a combination of of inks through the stencil, as well as making splatters with them and the lawn fawn sparkle to make a shimmery pretty backdrop.

I added a strip of purple holographic card and black glitter card from my stash, layered the image up with foam pads and added my sentiment strip.

Final touch was glossy accents on the pumpkin and bow to make them stand out 

If you want to enter, follow the challenge rules and post in on our Facebook page before the end of October to be in with a chance of winning XX of Wendy's images. 

I'd like to enter this into:

Country view challenges - Autumnal/Halloween 

Crafters Cafe - anything goes

Creative craft cottage - Anything goes

Pearly sparkles challenge - Autumn/Halloween

Colour crazy - anything goes

Cute card Thursday - anyhting goes

Addicted to stamps - dies and or stencils (stencil for the background)

Thanks for stopping by - please leave me a little note to make me smile, and check out my other social media pages which are linked on my home page.

See you again soon

Crafty hugs

Rachael

Wednesday, 15 September 2021

Createful heart GDT

 Hi everyone

Following a win on the crateful heart design blog, I was not only offered a prize of some beautiful images, but also the chance to appear on as a GDT.  Of course I jumped at this - its my first invite since the new blogs been running and I was more than delighted to help out.

Createful heart designs has some gorgeous images on Etsy and you can enter their challenge with any image.  Its always anything goes so why not hop over and enter your own projects for your chance to win some special images.

Here is my GDT entry and what a super cute giraffe he is...


Ingredients

  • Createful heart baby giraffe image
  • Coloured with spectrum noir triblend brush markers
  • Splatters are Wild honey, Ground espresso distress inks and Black watercolour paint
  • graphics package for sentiment and image - craft artist

Using craft artist I typed a cute 'Hello' sentiment in a free font and set my giraffe and the edge of the page as if he was peering in.  I then printed this on marker friendly card.

I then printed another copy on printer paper and cut the giraffe out as a mask.

I placed the mask over the giraffe and set about splattering my background with a combination of distress inks and a black watercolour paint.  I tried using black soot distress ink but found it more to be more grey than the black I wanted.

Once this had dried I used my markers to colour the image.  The whole panel was then added to a 5 x 7 card for a simple clean but super sweet card.  My son saw it and gave me the puppy eyes to take it away!

Please do check out the challenge over at createful hearts or pop onto the Etsy page to see some really amazing digi images!

I'd like to enter this into:

Crafty sentiments designs - anything goes

Get creative challenge - anything goes

Angie digital stamps - anyhting goes twist Autumn colours

Thanks so much for reading this far - please leave me a comment, and using the links on my home page, please follow me on other social media platforms too.

See you very soon

Crafty Hugs

Rachael