Showing posts with label floral. Show all posts

Saturday, 17 June 2023

Funky florals

Hello Crafting friends

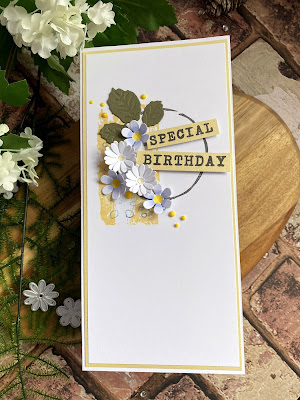
It is again time for another challenge over at Polkadoodles with our famous anything-goes challenge.  The DT team this week were challenged to use 'things' rather than people or characters so I pulled out my funky flower stamps to complete this CAS card.

The staps have a supporting stencil you can use to colour them but on this, I just used some alcohol markers and a bit of shimmer pen.  I then fussy cut the flowers out and added them to the card blank.  I then realized it was missing something so I doodled the edge in a black fine liner to make them pop! 


I'd like to enter this into:

Thanks for stopping by and leaving any comments! i have other social media channels listed above if you want to follow me on these instead.

See you again soon

Rachael 

Monday, 8 May 2023

May Flowers

Hello fellow crafters

Just dropping in with a quick post to remind you about the polkadoodles challenge that is live now!  You have two weeks to enter but there is a new challenge every week meaning you have extra chances to win some of Nikkys gorgeous images!

 This week I went back to the Blooming lovely USB, which is also available as a digital download.

Because they are digis you can increase the size, and angle to make a gorgeous flurry across the page.

For this one I also decoupaged it to I fussy cut those flowers that appear to be on top for extra dimension, but if you don't want to do this, you can just print the flowers along with the sentiment, cut to size and you're done  The package also comes with recoloured flowers for a really quick and simple card 


I coloured it with Copics and added a black matt layer so it popped, but otherwise - a really simple but effective card, that could say anything from happy birthday to I'm sorry

I'd like to enter this into:

Allsorts - April showers bring May flowers

Kraftin Kimmie - flowers and purple

sisterhood of snarky stampers  flowers

CD Sunday - anything goes as long as it's from a USB/digital

Lil Patch of crafty friends - Anything goes


Thanks so much for stopping by - I'll see you soon with more card-making inspiration - but if you can't wait for my next installment (or don't like all the chat!) please follow me on Instagram or pinterest (links are above)

See you soon and crafting hugs

Rachael 

Tuesday, 1 February 2022

ADU new challenge - Love.

 Hello everyone

After a short Christmas break the dressie girls are back with another challenge on our All dressed up Facebook - this month the theme is love.... with Valentines day just around the corner, you can use this as a chance to make a card and tell someone what they mean to you (ahhhhhh). Running from the 1st Feb. until the end of the month there's plenty of time to get your entry in, for a chance to win some beautiful images from the alldressedupstamps Etsy page.

I used this cute image called some bunny loves me 


I coloured her using copics and a glittery gel pen for added detail.  I die cut her out.  The back ground papers are from a Nitwit paper kit called Cottage Garden I cut them to size and used my corner rounder on one of the corners.  I matted it on white card stock to make it stand out and added a white doily die cut.

To finish the card I added pink faux stitching around the edge and some enamel dots in the corners

I hope you like it!  please check out the other inspiration from my teamies over at Facebook, or if you prefer a blog challenge, on the 15th we re-launch this too.  Also keep your eyes peeled for some super cute new stamps in the release this month - they are simply too adorable for words! 

I'd like to enter this into:

thanks for dropping by - see you very soon

Crafting hugs

Rachael

Friday, 7 January 2022

GDT Colour crazy challenge - Gerbera

 Hello crafting friends

I hope you are all wrapped up warm and staying indoors in this miserable weather! Unless of course you are in the Southern Hemisphere in which case -I'm very jealous!

It is once again time for the colour crazy challenge blog to host a new weekly challenge, and this week we are sponsored by the lovely Sheepski designs (Thank you Andrea for this gorgeous image!).

I wanted this image to be simply beautiful all on its own, so I made this:


Its coloured with a combination of copics and Prismacolour pencils.  I then fussy cut it out and popped it onto a card with foam tape.

I tamped a simple happy birthday greeting from my stash, and drew a wobbly line in black fine liner to finish it off.

I just love how dimensional it looks!

To join in our challenge, hop on over to Colour crazy challenge blog its always Anything goes, so you can create all type of projects (as long as you colour something!) to be in with a chance of winning images from Sheepski designs. 

I'd like to enter this into:

Thanks for stopping by - there is always inspiration on my other Social media channels to, or if you are a true blogger, please follow me here to keep up date date with any new projects from the desk in the glittery pink craft room.

Until then - Crafty hugs

Rachael


Thursday, 16 December 2021

Clean and simple floral design

 Hi everyone

I thought I would today share a clean and simple floral card, that I absolutely love.  Happy yellows and blues, with lots of white space, it makes my heart very happy!


Ingredients

  • Stamps
    • Oakwood archer - distress texture back ground stamp
    • Oakwood archer - distress type stamp
    • Oakwood archer - distress circle background
  • Dies
    • Oakwood archer rose die set
    • Oakwood archer ladybird die set
  • Yellow Nuvo drops
I stamped the yellow distress background onto a piece of card slightly smaller than DL and then stamped the circle/dots in blue over it.  I then stamped the bigger circle and left he panel to dry.

I die cut the leaf from the rose set in green card stock and the flowers from the ladybird set in white, and added a bit of colour.  To add dimension I used my embossing tool to shape them. 

Finally I matted the DL card onto some pearlescent yellow card, and used the off cut strips to stamp my sentiment.  I then glued the whole thing together.

I hope you like it

I'd like to enter this into:

Dare to be Artsy - CAS

Double D's - lots of white

Classic design challenge - AG

Crafting happiness - Anything goes

If you like these stamps and dies, then there is an Oakwood archer show on the 19th December on The crat store, where you can buy these goodies. 

In the meantime, there will be more inspiration from the Glittery Pink Craft room on Facebook, Instagram and Pinterest.  if you want top check this out, please use the links on my home page to take you straight there.  Please like and follow me! 

See you soon

Crafting hugs

Rachael


Friday, 19 November 2021

Floral thanks

 Hi everyone

I recently went to the NEC craft show.  It felt so good to be back and be able to watch the demos and actually see the product.  I've ordered so much on line during the pandemic I'd forgotten the thrill (and how much it was going to cost me) seeing all the lovely show samples.


I brought a few new stamps (of course!!_) and some were the woodware ones.  I have had some in the past, and I had forgotten how good some of the designs are.  I decided for this card however to get some florals.  I have a few altenew florals but wanted something a bit different.

Ingredients

  • Stamps
    • Woodware Garden spray
    • Woodware texture
    • Waltzing mouse sentiment set (this is older than I can remember and I have no idea what is called the packaging is loooong gone!) 
  • Coloured with watercolour - Windsor and Newton set
  • Distress oxide inks for stamping texture
    • picked raspberry
    • black soot
  • stamped with black Versafine ink and heat embossed with clear wow embossing powder 
  • Sentiment stamped with Versamark ink and white wow embossing powder
I firstly stamped and coloured the image onto watercolour card stock.  I wanted a bold look for this one.  I did another card at the same time with a completely different soft feel that I'll show later but this I wanted to be bright and cheerful.

Once I'd stamped and embossed it, I added water to the petals and dropped in some watercolour paints onto the wet from the centre so the colour spread outwards.  I did the same for the leaves.  I then hit it with my heat tool to dry it and did the same again to add depth of colour.  To finish I used more intense colour and added the detail in.  

I then left this to dry while I worked on my background.

Using the same colour paint I'd used for the flowers, I watered it down and added blobs to my glass mat, and added some lawn fawn liquid sparkle to it for shimmer.  I then smooshed another piece of watercolour card into this, dried it and repeated for texture.  Once I was happy with this, I then used the texture stamps to add detail to the background around where I knew I wanted to place my stamp.

I fussy cut out the stamp, added the heat embossed sentiment and matted onto black card stock.  

I hope you like this -  change from the cutie stuff for sure, and a perfect stash filler in case I have to say thank you!

I'd like to enter this into:


I'll back back soon with more makes, to make sure you don't miss out please follow me here on on any of my other social media channels.  

See you very soon
Rachael


Wednesday, 11 August 2021

From sweet to sour....

 Hello everyone in blogger land!

Hope everyone is feeling fine this August day (I'd like to say sunny August day but I live in England and therefore its raining... again!)

To cheer me up and to remind me of sunshine and the Mediterranean (I hopefully I can go soon and enjoy the real sunshine and sangria!), I've made a card today using a Pink Fresh studio stamp.


Ingredient list

  • Pink fresh studio - Lemons and Blueberry stamps
  • Nina smooth Kraft card
  • Prismacolour pencils
  • MFT  - little Hello dienamics 
  • Ink - lawn fawn jellyfish ink 
A simple CAS design today.  I stamped the image for a no line colouring look. I had to do some stamp surgery though as I haven't got the die and it comes as one big strip.  I wanted them all to be separate so I took my scissors and delicately chopped it up.

 I decided on a kraft background for a change, and dusted of my Prismacolour pencils too.  I needed some colouring therapy, so this image was perfect as it too me about an hour to colour it all in.

The sentiment I cut from a cream card stock four times and layered them together for some dimension on the card.

I'm so pleased with the way the colouring turned out I almost don't want to give this one away. I might have to add it to my shelf of other projects I made and couldn't bear to part with - do you do this too or is it just me?   

Thanks so much for taking the time to read through and look at my makes - leave me a comment, and if you are on Facebook, Instagram or Pinterest, my buttons are to the right so you can follow me there if its easier.

See you all very soon

Crafty hugs

Rachael