Sunday 19 September 2021

No buddies like snow buddies

Hi crafting friends.

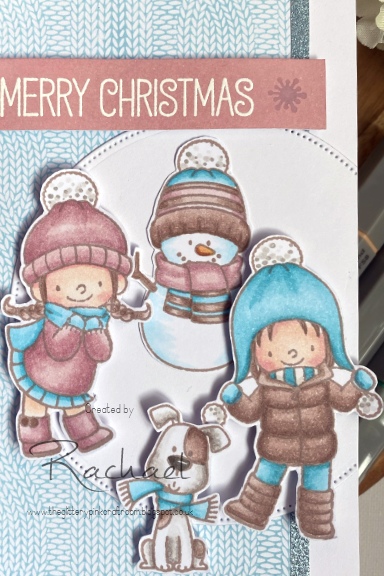
Today I'm sharing a make using my favourite MFT Christmas set called snow buddies.  This will be my first Christmas make, so I guess I had better get cracking to make the rest!  Look out for many more Christmas makes coming your way! 


Ingredients

  • Stamps
    • MFT snow buddies stamps
    • ink blot shop cable knit background
    • MFT - general BB sentiments
  • spectrum noir triblend brush markers
  • tattered lace dotted simple circle die
  • distress oxide inks
    • broken china
    • Victorian velvet
A simple card today - I stamped the background panel using broken china ink and left is aside to dry, while I coloured my stamped images. I cut out the circle from white cardstock and trimmed one side down so it would look like it was popping off the side of the card. 
I cut them out using my scan and cut and positioned them onto the circle background to make a topped.  Some of the images are flat and some are popped up on foam pads.
I then cut a strip of blue glitter card and trimmed my back ground panel to me slightly smaller than the 5x7 card.  

I decided to balance the colour, I should do the sentiment in pink, so I stamped in Victorian velvet, but found it wasn't bold enough, so I coloured a scrap of white card with the distress oxide and then let it dry, before white heat embossing.  I stamped a snow flake too in the same colour ink for a tone on tone look. 

I hope you like it as much as I do - I really love the muted non traditional colours! 

I'd like to enter this into:


Please leave me a comment if you land here - I love to read them, and also if you prefer other social media, check out the top right of my home page for more links!

Crafty hugs

Rachael 


Friday 17 September 2021

Busy little bee

Hi everyone

I'm sharing a cute image today from 'All dressed up' called busy little bee, and she is just darling!

Our Facebook challenge currently is things with wings and you can enter with a chance of winning 3 of Wendy's amazing images.  Our only requirement is to use an all dressed up image.  there are some freebies on our blog if you team them up with a butterfly, dragonfly or other cute winged creature then you can enter! Our Facebook page can be found here. 


Ingredients

  • All dressed up stamp - busy little bee (found here on Etsy) 
  • spectrum noir trtiblend brush markers
  • stitched basic rectangle die 
  • Pink petticoat honeycomb digi paper
  • Simon says stamp Bee yourself
  • nuvo  drops
    • white blizzard
    • ebony black
I printed and coloured the digi image, before cutting her out using the die.  I
layered the image onto black card stock, as well as cutting a piece of the honeycomb background also matted with black.  I stamped the 'bee yourself' and coloured it in, as well as filling it in with the white blizzard nuvo drops for shimmer and dimension.  I also added two drops of this to her headband.  Finally I used the black drops to add detail to the top and bottom for balance.

Isn't she soo sweet!

I'd like to enter this into:


Thanks for stopping by - if you would like more inspiration, I have pages on Facebook, Pinterest and Instagram - links on my home page (top right).

See you very soon
Crafty hugs
Rachael 
 

Wednesday 15 September 2021

Createful heart GDT

 Hi everyone

Following a win on the crateful heart design blog, I was not only offered a prize of some beautiful images, but also the chance to appear on as a GDT.  Of course I jumped at this - its my first invite since the new blogs been running and I was more than delighted to help out.

Createful heart designs has some gorgeous images on Etsy and you can enter their challenge with any image.  Its always anything goes so why not hop over and enter your own projects for your chance to win some special images.

Here is my GDT entry and what a super cute giraffe he is...


Ingredients

  • Createful heart baby giraffe image
  • Coloured with spectrum noir triblend brush markers
  • Splatters are Wild honey, Ground espresso distress inks and Black watercolour paint
  • graphics package for sentiment and image - craft artist

Using craft artist I typed a cute 'Hello' sentiment in a free font and set my giraffe and the edge of the page as if he was peering in.  I then printed this on marker friendly card.

I then printed another copy on printer paper and cut the giraffe out as a mask.

I placed the mask over the giraffe and set about splattering my background with a combination of distress inks and a black watercolour paint.  I tried using black soot distress ink but found it more to be more grey than the black I wanted.

Once this had dried I used my markers to colour the image.  The whole panel was then added to a 5 x 7 card for a simple clean but super sweet card.  My son saw it and gave me the puppy eyes to take it away!

Please do check out the challenge over at createful hearts or pop onto the Etsy page to see some really amazing digi images!

I'd like to enter this into:

Crafty sentiments designs - anything goes

Get creative challenge - anything goes

Angie digital stamps - anyhting goes twist Autumn colours

Thanks so much for reading this far - please leave me a comment, and using the links on my home page, please follow me on other social media platforms too.

See you very soon

Crafty Hugs

Rachael 


Saturday 11 September 2021

Dino rawr!

Hello again

I'm back with more from the desk of the glittery pink craft room.  This time its cute dinosaurs'.

I've always loved dinosaurs, and my son is like some super palaeontologist who knows the names of them all - some I have never even heard of!   These are from Mama elephant and there are two different stamp sets both dino based, and I cannot resist a cute boys dino card! I know the name of these - they are simply dino rawrs! ha ha 


Ingredients

  • Stamps
    • Mama elephant little dino agenda
    • Mama elephant Me and my dinosaur
  • inks
    • Memento tuxedo black 
    • Salvaged patina distress oxide
    • twisted citron distress oxide
    • mowed lawn distress oxide
  • Tattered lace basic circle die
  • Cloud stencil
  • glossy accents
  • Tonic glitter gloss
I stamped and coloured the images, before using my scan and cut to cut them all out.  I die cut a circle and using a cloud stencil I made a sky back ground.  I then cut a wavy line from some whit card stock and using my circle die cut I made grassy hills to add onto the background and ink blended them using the green distress inks

I then layered up the circle using the stamps.  There was still a bit too much white on the card, so I went through my scraps and found this black and white stripy paper to be cut into a strip on the left.  finished with a sentiment from the stamp set, and highlights of tonic shimmer and glossy accents. 

I'd like to enter this into:


Thank you for your support so far, I just love reading your comments and every like and follower I get I am truly grateful for!  If you want to see more, or are on social media, please click open the links on my home page (top right) for more!

See you soon
Crafty hugs

Rachael 

Tuesday 7 September 2021

Super exciting news!

 Hello everyone

I have some super exciting news to share... I'm back on the All dressed up design team... and I am totally thrilled and delighted to have an invite back. I cannot tell you how excited I am to be working with this talented team once again.  

My first post back on the design team is their new release, and OMG they are just amazing!!

Heres the card I made using dogs in shades. 

This image can be separated (which is what I did) I felt these doggies needed to be photographed! So with that in mind here' s what I made


Using a polaroid die I have ( I don't know what brand it is as it was from my moms stash when she died) but it also has this little 'smile' die with it.

I cut the frames out of white cardstock, and sized the images to fit in the photo part of the die using craft artist.  Once I had them the right size I cut these out too using the same die so it would slot back in the opening seamlessly.  The background was made using picked raspberry distress ink and black watercolour paint over a paw print stencilled also in picked raspberry.  Very subtle colour to make the images pop out.  The pawsome sentiment was also made on  craft artist and cut as a strip to add to the bottom.  Because of the size of the pictures a DL card was needed to fit them all in.  I then finished the card with some black Nuvo drops for shine and dimension, as well as  glitter and a black sakura gelly roll pens for the sunglasses and bling.

Here's the all of the new release images in full. All images are available on Etsy and you can buy them now!

Dogs in shades


Star

Dude

We have some challenges on going. On Facebook we have a challenge entitled 'with wing's' so any all dressed up image with wings can be entered, or on our blog there is a anything goes challenge (using an all dressed up image)  this closes on the 14th September.  All prizes are some of Wendy's gorgeous images, but if you don't win, please check out Etsy anyway.  You won't be able to resist!

I'd like to enter this into:

Colour crazy - anything goes (2nd entry) GDT

A gem of a challenge - Anything goes

Cards 4 galz - international dog day

Lil patch of crafty friends - anything goes


If you land here - I would love for you to leave me a comment as well as using the link on my home page and following me on Facebook, Instagram and/or pinterest. All followers greatly received! 


See you very soon

Crafty Hugs

Rachael 


Saturday 4 September 2021

Lets stick together

 Hi crafty friends

Just a quick post today - I'm dropping in to share this anniversary card I made using MFT Stamps.

I really loved the frames I did on the card a few weeks ago, but wanted something thinner, so I used nesting dies together to create these frames.  I wanted it to be quite bold and geometric, and this is what I came up with


Ingredients

  • MFT stamps - lets stick together
  • Coloured papers from my stash
  • Nesting basic rectangle dies from tattered lace
  • Coloured with Copics
  • Stamped with lawn fawn alcohol friendly ink
  • Wow fine white embossing powder. 
  • Dotty stencil (brought from The Range)
  • squeezed lemonade distress oxide
  • Black nuvo drops
I firstly stamped and coloured the images from the set, and stamped one of the sentiments on a strip of black card stock, embossing it with fine white wow powder.

I then set the images to cut out on my scan and cut while I started the background.  On the card blank I used a dotty stencil and lightly added squeezed lemonade for some interest in the background.  I then used two nesting dies that were one size apart, taped them so it would be even around the edge, and die cut these from black, orange and yellow card stock to create three frames.

I layered these up at jaunty angles, before adding the cactus in with a combination of glue and foam dots adding the sentiment across the middle.  I felt it was missing a little detail to balance the card out, so added one black nuvo drop to the bottom right corner.  Sometimes its the smallest thing that makes the difference.

I hope you like this design, there are many more on my blog or social media pages to scroll through (the link is on my home page in the top right corner)

I'd like to enter this into:


If you'd like to add a comment I love to read them it makes my day to get happy emails, rather than the usual junk that we get!!

See you soon

Crafty hugs
Rachael


Thursday 2 September 2021

Odd dog says 'Happy Birthday'

 Hi Everyone

Today I'm sharing a Lili of the valley Digi stamp featuring Odd Dog from Etsy I brought these when the were first released and realised when going through my computer I don't think I have ever used him!

He was just so easy to colour, and so adorable, I think I might print off some more and colour them in, ready for future projects

As I've explained in previous posts I'm currently building my stash back up and always need more men's cards (and aren't they the hardest to make!)

So I teamed him up with some simple backing paper, for a really clean design birthday card.


Ingredients

  • Odd dog just for you - LoTV on Etsy
  • Papermania backing papers masculine collection
  • Coloured with Copics
  • Stamps - Lisa Horton Everyday tickertape sentiments
  • Ink - versamark black pigment ink
  • Wow clear embossing powder

After resizing the image on craft artist, I printed him out on marker friendly card and coloured him using Copics. 

I die cut him out using a tattered lace stitched rectangle die and also trimmed a piece of backing paper to go down the side of the 5x7 card.  It still needed a little something, so I added a thin black strip of paper down the middle separating the coloured paper from the white background as well as a black mat around the image.

The sentiment was from my favourite sentiment set from Lisa Horton, I stamped it in black and added clear embossing powder to give it some shine. (hence the photo with the light reflecting off it!) 

It was all stuck together with glue and foam pads.

I hope you love him as much as I do!  If you are reading this, I'd love to read your comments - let me know what you think.  If commenting isn't your thing, then please follow me on Facebook, Instagram or Pinterest (links on my home page on the top right) 

I'd like to enter this into:

Cute card Thursday - Anything goes

Crafty Animals - with an animal

Double D Challenge - things with a tail

Cards 4 guys - Things with a tail

Crafty sentiments - Anything goes

Through the craft room door - anything goes

See you very soon

Crafty hugs

Rachael