Showing posts with label nitwit. Show all posts

Wednesday, 22 February 2023

Up. up and away!


Hello crafting friends

Its time for another new release over at all dressed up and although valentines has passed, this release can be used for so much more.

Here is my inspiration using valentines boy


I coloured him with a combination of copics, then using polychromos pencils for extra depth and detail.

The papers are from a Nitwit digi kit that I layered together, and then fussy cut the cute image and added with foam tape for dimension

Here are all of the new releases

Looking good (re-release)
Valentines boy
Valentines girl

Our Facebook challenge is still ongoing here  with the theme of celebrations, or hop over to our challenge blog where the theme is anything goes!

Thanks so much for stopping by today - it really does mean the world when I get emails with your comments on them.  Follow me on Facebook, or instagram for more

See you again
Crafting hugs
Rachael


Sunday, 24 July 2022

You are awesome!

 Hello crafting friends

I'm back with an other new release from the fabulous Wendy Burns over all dressed up.  

Thee new releases are all available on Etsy as well as lots and lots of oldie but goodie images too.  Pop over and have a look! 

I used flower dreams this month.


I decided I was going to use a softer coloured look, so printed her in a lighter grey and then coloured her using only Polychromos pencils.  The digi kit in the background is one from Nitwit and I fussy cut several elements to position around her.

She is just so adorable.  

Don't forget our challenge is still on going on our Facebook page - with the theme holidays (this could be summer of winter holidays too!) or our anything goes over on the blog.  as long as you use an all dressed up image! 

I'd like to enter this into:

Thanks so much for stopping by - I'll see you again soon for more crafty inspiration from the desk of the glittery pink craft room.

Crafting hugs

Rachael


Friday, 15 April 2022

Spring wellies

Hello everyone

I've been on holiday this week, and had a few hours crafting time.  I decided to challenge myself to something different, and went to my Nitwit digi scrapbooks to create some cards that don't involve colouring.

I needed some Easter and spring cards to send out, and although I do have a lot of Easter stamps and digi stamps, I decided to do some mindful fussy cutting and layering instead. 


This is one of the cards I made - in the end I made about 10 cards using the same kit.  I find sometimes to limit the supplies helps bring back my mojo, and stretch my creative brain.  It was so much fun to do this for a change!

This kit is called Spring wellies

All I did was chose the images and lay them out in my craft artist software, then print them.  I spent a while fussy cutting everything, then printed some matching backing papers.  The using glue and foam pads, made my cards, in all different shapes and sizes. 

Thank you for stopping by - I really appreciate you taking the time to drop in.  If you want more inspiration please check out my Facebook, Instagram and Pinterest boards too.(link up above)


I'd like to enter this into:

Alphabet challenge  - A is for animal antics (that naughty cat is clearly up to no good!)

Crafty catz - AG but option April showers

C.R.A.F.T - Spring

Through the purple haze - add an animal

Crafty gals corner - Spring

See you soon

Crafting hugs

Rachael


Friday, 1 April 2022

A cuddle makes it all better

 Hi crafting friends

If you have never been here before - a warm welcome, and for those who have, thanks for stopping by again!

Today its a card made using one of the older all dressed up images called 'a cuddle makes it all better.'  This is for our Facebook challenge starting today over on our page.  The theme for this month - Lets be cute, and what is possibly cuter than a little girl hugging her dog!


After printing her out, I decided I wanted to layer this card up, so I used a Nitwit scrapbook digi kit called Day to Day.  I resized several elements and printed them out, before arranging across my card.

I coloured the image using a combination of copics and Prismacolour pencils.

Once I had arranged everything, I adhered everything down using a combination of glue and foam pads, and finished with some sparkly stickles around the edges of the butterflies and on the flowers.

I love the colour palette on this - I would never think to put raspberry pink with mint green, but I think its beautiful.

Please check out our Facebook page and our challenge blog, you can enter both, multiple times for a chance of inning three gorgeous images from Wendy.  All we ask is you use the all dressed up images.  If you don't have any there are some freebies on the blog to get you started, or hop over to the etsy page and treat yourself.

The DT have some amazing inspiration!

Watch out for the new releases coming soon too!

I'd like to enter this into:

Thanks for stopping by - I'd love it f you left me a comment, or were to follow me on Facebook, Instagram or Pinterest (links on the right at the top)

See you soon

Rachael 


Tuesday, 1 February 2022

ADU new challenge - Love.

 Hello everyone

After a short Christmas break the dressie girls are back with another challenge on our All dressed up Facebook - this month the theme is love.... with Valentines day just around the corner, you can use this as a chance to make a card and tell someone what they mean to you (ahhhhhh). Running from the 1st Feb. until the end of the month there's plenty of time to get your entry in, for a chance to win some beautiful images from the alldressedupstamps Etsy page.

I used this cute image called some bunny loves me 


I coloured her using copics and a glittery gel pen for added detail.  I die cut her out.  The back ground papers are from a Nitwit paper kit called Cottage Garden I cut them to size and used my corner rounder on one of the corners.  I matted it on white card stock to make it stand out and added a white doily die cut.

To finish the card I added pink faux stitching around the edge and some enamel dots in the corners

I hope you like it!  please check out the other inspiration from my teamies over at Facebook, or if you prefer a blog challenge, on the 15th we re-launch this too.  Also keep your eyes peeled for some super cute new stamps in the release this month - they are simply too adorable for words! 

I'd like to enter this into:

thanks for dropping by - see you very soon

Crafting hugs

Rachael

Wednesday, 19 January 2022

Surprise strawberries

 Hello everyone

I think in my head I'm in summer, as my favourite cards at the moment are all summer themed!  Here's another one I made using a combination of things. I wanted to make something other than a flat card, I wanted a fancy folded one. Here's the full thing:


Its a gatefold card - so the outside has a bellyband and looks like this

Then inside when you open it, there is this cute image from tiddlyinks (it's now retired but its from my old drive where I have loads of tiddlyinks images!)


Ingredients

  • Tiddlyinks digi stamp (retired) - Berrylicious
  • Elisabeth craft - strawberry die
  • Nitwit digi paper collections - Sweet preserves
  • Coloured with Spectrum noir triblend brush markers
  • Tattered lace stitched circle die

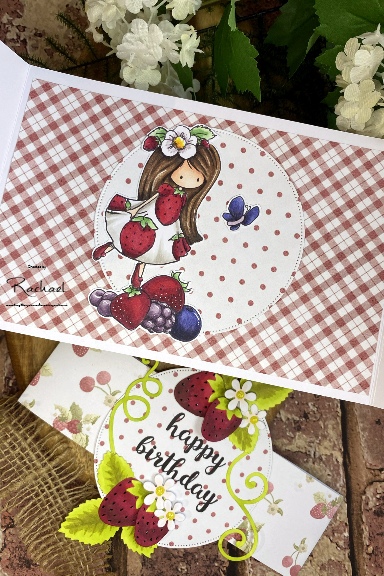
I firstly printed all of the papers I wanted to use so I could match the colours, before colouring in this super cute strawberry image from  Tiddlyinks.

I have some card blanks that are unscored, this one normally forms a 5x7 card, but instead I scored lines at 3.5 inches and again at 10.5 inches to create a gatefold card.

I cut out the panels to go both inside and outside the card, as well as cutting two matching die cut circles from the dotty paper in the collection.

I fussy cut the image out and stuck her inside the card onto one of these circles

To make the belly band I cut a strip of paper 2 inches wide and slightly longer than the card, glued them end to end and folded to form a snug (but not tight) band, gluing the circle at the join.  I stamped the happy birthday from a set that was in a bundle I brought from a craft show (I think they were rare earth or tattered lace from a long while ago??) around this I wanted my strawberries, so I die cut them from white card stock and coloured them in to match the image inside, using glue and foam pads for dimension.

I hope you like it and it makes you remember long summer nights in June with fresh strawberries and cream! 

I'd like to enter this into:

Passion for markers challenge - use a die (strawberries and circles)

Through the craft room door - anything goes

A place to start - anything goes

Double trouble - thing 1. Use three patterned papers

Pammies pinkie inkies - anything goes

Lil patch of crafty friends - anything goes

Please leave me a comment if you land here, and if you are a SM user, there are some links on my home page that will take you to Facebook, Instagram and Pinterest so you can follow along.

See you soon - crafting hugs

Rachael 


Sunday, 31 October 2021

Witches brew part two

Hello everyone

As promised in my last post - this is the final Halloween (that’s not Halloween) for 2021.

Using the same LoTV digi stamp set with the cutest witches and wizards, this one was made at the same time to use up papers I had printed and because if you're going to print one digi, you may as well print several on a page!


Ingredients

  • Lili of the valley stamps - Spooky toadstool
  • Nitwit Papers - Halloween Hooligans
  • Black Nuvo drops
  • Glitter - tonic shimmer pen
  • Coloured with Spectrum noir triblend brush marker 

For this witch, I fussy cut her out leaving a tiny white border.  I matted and layered the coloured papers with black and added a final strip down the middle to help her 'pop'.

I hope you like them both - I think they are super cute, and shouldn't be just for October 31st.

Please leave me some love in the comments box – which witch is your favourite?

Also check out my other social media pages on my home page for other ways to follow what I make.


See you soon

Crafting hugs

Rachael


Friday, 29 October 2021

Witches brew part one

  Hi everyone

Here are my final Halloween cards, that are not really Halloween cards. This post and the next one shows two stamps from the same set. 

I made them using the last release from Lili of the valley.  I loved these cute witches so much, I couldn't resist them.  I can use them for all sorts of cards rather than wishing Happy Halloween.

This first one is a "just because" card, 


Ingredients

  • Lili of the valley stamps (1) Pumpkins and (2) is Spooky toadstool
  • Nitwit Papers - Halloween Hooligans
  • Black Nuvo drops
  • Glitter - tonic shimmer pen
  • Coloured with Spectrum noir triblend brush marker 
  • Tattered lace stitched rectangle die
  • Sentiment Mama elephant stamp set - sending hugs 

I printed both images out to save on paper and ink and coloured them using my alcohol pens.   I used the same colour scheme for each so I could use up some papers I had already printed for a previous project.

For card number one,

I used some paper to over approx. half of my A6 card blank and added a strip of scrap black card to add extra interest.  I die cut my pumpkin witch onto a rectangle before placing her at a jaunty angle.  I Stamped the sentiment in white and embossed, adding it a he same angle.  I then decided it need more shine so I added glossy accents to make it stand out.

Finally I added black Nuvo drops to balance the space. 

I'd like to enter her into: 

If you've landed here (either on purpose or accidentally!) then please leave me a comment so I know you've been.  If blogging isn't your thing - I'd love to see you on my FB, Insta or Pinterest pages (link on the home page top right!)  either way I'm just happy you're here!

See you again very soon.


Crafting Hugs

Rachael.


Friday, 22 October 2021

October new release at All dressed up

 Hi crafty friends

I am so privileged to be part of this design team, every month Wendy sends us incredible new release images to play with.

This month I got this cutie called witches hat. (get it here from Etsy)


 I made a couple of cards, but in the end decided on a trick or treat bag I can hand out to the kids that come knocking on my door on Oct 31st.  I did put some sweet treat in it - then ate them!  I'll have to refill before the end of the month

Ingredients

  • Witches hat digi image
  • Copic markers to colour
  • template from craft artist software
  • embellishments and tag from a nitwits digi kit Halloween hooligans
  • white ribbon and twine from my stash that I coloured with copics
  • Die - plain circle from tattered lace
I used the digi kit from nitwit and my craft artist program to put together the patterned box template, cut it out and assembled it.  I then printed the image on white cardstock and coloured with copics, before cutting out using a plain circle die. It needs some more embellishment so I went back to the nitwit kits and typed a sentiment onto a tag and cut out along with the extra the bats 

I didn't have the right colour thin ribbon, so I used some white and coloured using copics, and some white twine to finish.

The other new releases are just as sweet

Hedgehog flower

Pumpkin Cutie

Please check out our Facebook page and blog for more inspiration from this talented DT team  and if you to purchase these images don't forget to enter them into out FB challenge of Autumn/Halloween or our anything goes challenge on the blog, to win more images to play with!

I'd like to enter this into:

Thank you so much for dropping by - I'd really appreciate it if follow my page her, on on Facebook, or Instagram (all links on the the home page on the top right).  I do read every comment and appreciate the time you take to make them.  Thank you!

See you soon

Crafty hugs

Rachael