Pages - Menu

Wednesday, 26 January 2022

up, up and awayyyyy

 Hello crafting friends

Hope you are all OK.  I made a couple of cards this weekend, so I thought I'd share one of them...


I made this using MFT up and away stamp set, A Tracey Hey paper pad, distress oxides (scattered straw and abandoned coral).  Coloured with Copics and embellished with enamel dots.

After colouring the stamps, I fussy cut them out along with a patterned paper circle die cut, and white circle.  I coloured this by ink blending the scattered straw, at the same time as using a stencil for a bit of interest in the background.  The sentiment from the stamp set was heat embossed on a black strip of paper, and I added everything to the card

This teddy is so super cute!

I'd like to enter this into:

Thanks so much for stopping by - if you'd like to leave a little love in the comment box I do read them all.  Alternatively follow me on on of my other social media pages (follow the links on the front page).

See you soon

Rachael 


Saturday, 22 January 2022

Scrap O'clock album

 Hello crafting friends

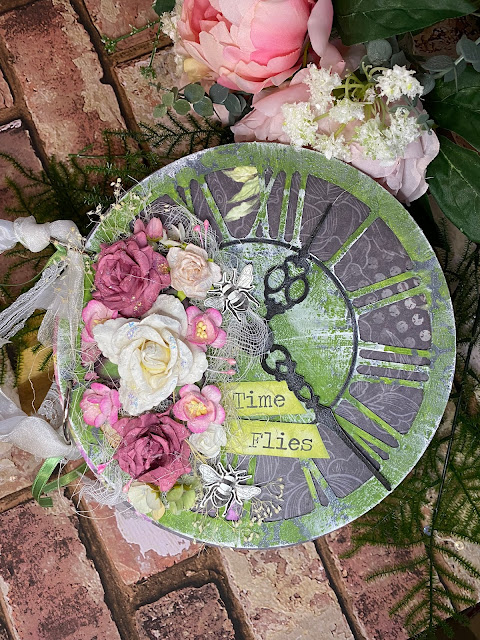
I'm not sharing a card today, but an album I made using a template from i-craft called scrap o'clock.

This can be purchased here  I was lucky enough to be sent it by Oakwood direct to decorate up ready for showcasing on the Craft store on Sunday 23rd January. 

It came as chip board covers and thick paper pages, and can be decorated in a variety of ways.


The clock face and backing card are separate when delivered, so I used a shabby black background paper to layer under the clock face itself.

To decorate the clock face I used some green texture paint from craft treat (its like moss and has a gritty texture)  I painted this all over before using some white gesso and a dried brush to knock back some of the green.  To add a further aged look I used craft treat grey cement texture paint through an i-craft crackle stencil to add more interest.

I then painted the inner ring and hands black, then used silver gilding wax all over.

I added a combination of natural fibres, cheesecloth and dried flowers as a base before adding paper flowers from my stash at the side.  I added glue and glass glitter onto the flowers, as well as some stickles for shine

The bees were cut out from the same pad the backing paper came from.

It was then put together and I used ribbon and lace to tie around the jump rings.

This is a very different project for me, but I hope you like it! - I got very inky and messy and my craft room looked like my paint had exploded!

I'd like to enter this into:

See you soon

Crafting hugs!

Rachael 

Wednesday, 19 January 2022

Surprise strawberries

 Hello everyone

I think in my head I'm in summer, as my favourite cards at the moment are all summer themed!  Here's another one I made using a combination of things. I wanted to make something other than a flat card, I wanted a fancy folded one. Here's the full thing:


Its a gatefold card - so the outside has a bellyband and looks like this

Then inside when you open it, there is this cute image from tiddlyinks (it's now retired but its from my old drive where I have loads of tiddlyinks images!)


Ingredients

  • Tiddlyinks digi stamp (retired) - Berrylicious
  • Elisabeth craft - strawberry die
  • Nitwit digi paper collections - Sweet preserves
  • Coloured with Spectrum noir triblend brush markers
  • Tattered lace stitched circle die

I firstly printed all of the papers I wanted to use so I could match the colours, before colouring in this super cute strawberry image from  Tiddlyinks.

I have some card blanks that are unscored, this one normally forms a 5x7 card, but instead I scored lines at 3.5 inches and again at 10.5 inches to create a gatefold card.

I cut out the panels to go both inside and outside the card, as well as cutting two matching die cut circles from the dotty paper in the collection.

I fussy cut the image out and stuck her inside the card onto one of these circles

To make the belly band I cut a strip of paper 2 inches wide and slightly longer than the card, glued them end to end and folded to form a snug (but not tight) band, gluing the circle at the join.  I stamped the happy birthday from a set that was in a bundle I brought from a craft show (I think they were rare earth or tattered lace from a long while ago??) around this I wanted my strawberries, so I die cut them from white card stock and coloured them in to match the image inside, using glue and foam pads for dimension.

I hope you like it and it makes you remember long summer nights in June with fresh strawberries and cream! 

I'd like to enter this into:

Passion for markers challenge - use a die (strawberries and circles)

Through the craft room door - anything goes

A place to start - anything goes

Double trouble - thing 1. Use three patterned papers

Pammies pinkie inkies - anything goes

Lil patch of crafty friends - anything goes

Please leave me a comment if you land here, and if you are a SM user, there are some links on my home page that will take you to Facebook, Instagram and Pinterest so you can follow along.

See you soon - crafting hugs

Rachael 


Sunday, 16 January 2022

Hap-pea birthday

 Hi everyone

Welcome back to my ramblings and looking at my work that's has been made in the glittery pink craft room.

My make for today is using what is probably my all time favourite stamp set.  It is very well loved and used a lot as its so good for both men and women's birthdays.


Its using Lawn fawn Be-Hap-pea stamp, as well as MFT stitched flower dies and Julie Hickey alphabet dies

I firstly stamped the images a few times and coloured them with copics.  I then cut them all out using the scan and cut.

While the machine was whizzing away, I stamped the background using Tracey Hey creativity stamp and cut and coloured the flowers also.

I die cut the sentiment three times and stacked them together before colouring the top one in an Ombre effect to match the colours used on the rest of the card

Once all the die cutting was complete i arranged them on my card and stuck them down with glue and foam pads.  To finish i added a faux blue stitched border around the edges, used tonic shimmer pen on the letters and then added glossy accents to the peas and the sentiment.

Looking at this makes me happy its so bright and cheerful!

I'd like to enter this into

Thanks so much for stopping by and checking out my blog.  I'm also on IG, FB and pinterest if you check out the links on the home page.

See you soon

Crafting hugs

Rachael


Sunday, 9 January 2022

Cake anyone?

 Hi everyone

Just a quick post to showcase a sample I made for the craft store show with Oakwood direct. It’s a gorgeous cake set that you stack together to make it as big or as small as you like. It’s so versatile I mean who doesn’t love cake on birthdays, weddings, engagements or just because!


The stamp is from stampendous called slim cakes and the flowers are from the rose teacup set  they were in a deal on the show.  I wanted some happy spring colours to brighten my craft room.

It’s coloured with comics and fussy cut out.  I layered some card from my stash and stamped the sentiment 

I hope you like it


Crafting hugs

Rachael


Friday, 7 January 2022

GDT Colour crazy challenge - Gerbera

 Hello crafting friends

I hope you are all wrapped up warm and staying indoors in this miserable weather! Unless of course you are in the Southern Hemisphere in which case -I'm very jealous!

It is once again time for the colour crazy challenge blog to host a new weekly challenge, and this week we are sponsored by the lovely Sheepski designs (Thank you Andrea for this gorgeous image!).

I wanted this image to be simply beautiful all on its own, so I made this:


Its coloured with a combination of copics and Prismacolour pencils.  I then fussy cut it out and popped it onto a card with foam tape.

I tamped a simple happy birthday greeting from my stash, and drew a wobbly line in black fine liner to finish it off.

I just love how dimensional it looks!

To join in our challenge, hop on over to Colour crazy challenge blog its always Anything goes, so you can create all type of projects (as long as you colour something!) to be in with a chance of winning images from Sheepski designs. 

I'd like to enter this into:

Thanks for stopping by - there is always inspiration on my other Social media channels to, or if you are a true blogger, please follow me here to keep up date date with any new projects from the desk in the glittery pink craft room.

Until then - Crafty hugs

Rachael


Thursday, 6 January 2022

Oakwood - thanks a bunch

 Hi everyone

We have another fab show coming up at 'The Craft Store' with our very own Tina Barnett.

One of the stamp sets this time is called 'thanks a bunch' and I had so much fun playing with it.  When the ideas started flowing it turned out to be so versatile.

This is a stamp from @PaperRoses and will be featured on the show which is on the 8th at 3pm.


This sample I just stamped in black then masked the edge and stamped again.  I added a sentiment too, and then some splashes of gold to give more interest


This sample I stamped onto dark purple card, and embossed the detail in Stampendous gold embossing powder. Using prismacolour pencils I coloured the detail to bring it to life.  Finished with the sentiment from the stamp set, which i stamped and embossed in gold onto a torn vellum strip


My final sample, I stamped onto watercolour card and embossed with White powder.  This time I wet the paper and used a wet on wet watercolour technique to build up the blue colour.  I found a matching card stock from my stash to mat it onto, and stamped a sentiment on a scrap of this too.

I love them all, but I think the black and white one just edges in front as I think its so striking in the monochrome. 

There are other samples on the show with other stamps and dies, and I'd love for you to check them out and at the same time stock up your crafty baskets with some great bargains! 

See you soon

Crafting hugs

Rachael 

Monday, 3 January 2022

Another Alice....

Hello everyone

Hope you are all feeling good after the new year celebrations, and looking forward to another year of crafting inspiration direct from the desk of the glittery pink craft room!

I'll start by thanking everyone who visits, follows and comments here.  I started my new blog in July last year, along with other SM platforms, now knowing what would happen, but since then I've gained loads of IG followers, as well as started new followers on this blog.  If you have landed her accidentally, please take a look around.  To follow me, please click on the main page on the right, all links are there! 

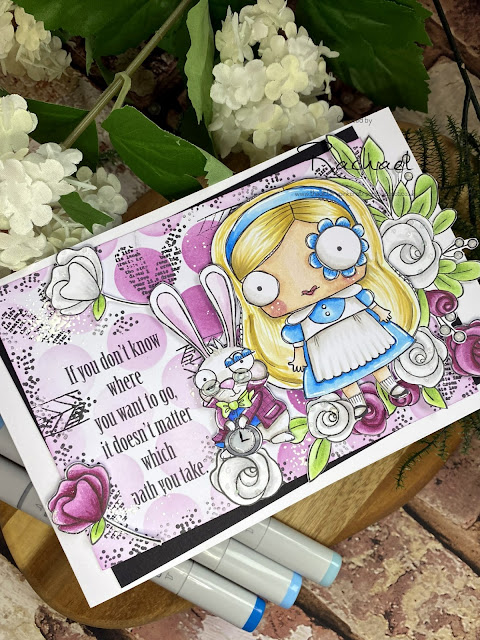
So... the last few cards you may have noticed I have looked around on Etsy for some new designers and ideas to play with.  I came across Vera Lane studios (who you may recognise from some of the aall and create stamps.  I have always love Alice in wonderland, and when I saw there was a different type of Alice, she was added to basket and checked out quicker than I could say 'I'm late!' 

I also wanted to try a bit of a new style.  Grungy but with pretty flowers and colour, so this was the combo I came up with.  I made several in this style and am loving it!


Hope you like it too!

I'd like to enter this into:

See you all soon for more card making and papercrafting

Crafting hugs
Rachael 

Saturday, 1 January 2022

Birthday girl in Blue

 Hi Everyone

Happy new year!

Hope you all had a great festive break and enjoyed the celebrations.  Here's hoping 2022 see's the end of the COVID restrictions and outbreaks!

Today I thought I'd share another card I made using a new designer I stumbled across while browsing Etsy.  I had a whole bunch of these cute girls in a bundle and they are so super sweet.


Ingredients

  • Digi stamp - NataliaSzGraphics (Etsy)
  • Coloured with Copics and polychromos
  • Polkadoodles stamp set (from Oakwood Archer)
  • Die - Elizabeth craft designs
I coloured in the usual way using alcohol makers with pencil to add in the finer shading and detail and fussy cut her out.  The sentiment was stamped and embossed and assembled on top of a die cut oval.

I hope you like her - I have a couple more girlies on my desk to colour so she won't be the last.

I'd like to enter this into:


See you all soon


Crafting hugs and best wishes for 2022
Rachael